How To Thread A Singer Sewing Machine
Sewing machines can seem intimidating at first glance with all their knobs, buttons, and levers. However, learning how to properly thread your Singer sewing machine is easy with just a few simple steps.
If you’re short on time, here’s a quick answer to your question: Set your machine to the highest needle position, raise the presser foot, and follow the threading guide from back to front passing the thread through the take-up lever. Pull 4-6 inches of thread through the needle eye to the back.
In this comprehensive guide, we’ll walk through every step of threading a Singer sewing machine from start to finish. We’ll cover how to wind the bobbin, thread the top portion, and finish by securing the threads.
With some practice, you’ll be threading your Singer sewing machine like a pro in no time!
Understanding the Main Parts of a Singer Sewing Machine
Before you can start threading your Singer sewing machine, it’s important to familiarize yourself with its main parts. By understanding the different components, you’ll be able to thread your machine with ease and confidence.
The Spool Pin
The spool pin is where you place your thread spool. It holds the spool in place and allows the thread to unwind smoothly as you sew. This small but important part is typically located at the top of the machine, near the bobbin winding system.
The Bobbin Winding System
The bobbin winding system is responsible for winding thread onto the bobbin. It consists of a bobbin winder, a tension disc, and a bobbin winding mechanism. To wind a bobbin, you’ll need to place an empty bobbin onto the bobbin winder, thread the thread through the tension disc, and engage the bobbin winding mechanism.
This will wind the thread onto the bobbin, ready for use.
The Thread Guides
The thread guides are small metal or plastic loops that guide the thread through the machine. They ensure that the thread follows the correct path and tension as it moves from the spool pin to the needle.
The number and placement of the thread guides may vary depending on the specific model of your Singer sewing machine.
The Take-Up Lever
The take-up lever is a metal bar that moves up and down as you sew. Its main function is to take up the slack in the thread and ensure smooth stitching. It’s important to thread the thread through the take-up lever correctly, as improper threading can lead to thread breakage or uneven stitches.
The Tension Disks
The tension disks are two metal discs that control the tension of the thread. They are typically located near the take-up lever. By adjusting the tension, you can ensure that the thread is neither too loose nor too tight, resulting in balanced and even stitches.
The Needle
The needle is perhaps the most crucial part of any sewing machine. It’s responsible for piercing the fabric and creating stitches. Make sure to use the correct needle size and type for your project, as different fabrics require different needle sizes.
Additionally, regularly replacing the needle will help prevent skipped stitches and other sewing issues.
By understanding the main parts of a Singer sewing machine, you’ll be able to thread it correctly and enjoy seamless sewing. For more detailed instructions and visual demonstrations, refer to the official Singer website (www.singer.com) or consult your machine’s user manual.
Winding the Bobbin
Placing the Spool on the Spool Pin
Before you can start winding the bobbin on your Singer sewing machine, you need to ensure that the spool of thread is securely placed on the spool pin. The spool pin is usually located on the top of the machine, near the bobbin winding area.
Make sure to choose a thread that is suitable for your sewing project and place it on the spool pin, ensuring that it rotates freely.
Threading the Bobbin Winding System
Once the spool is in place, you need to thread the thread through the bobbin winding system. This system is typically located on the top of the machine, near the spool pin. Follow the instructions in your Singer sewing machine manual to properly thread the thread through the designated guides and tension discs.
This ensures that the thread is correctly positioned for the bobbin winding process.
Engaging the Bobbin Winder
After threading the bobbin winding system, you need to engage the bobbin winder. This is usually done by moving a lever or pushing a button, depending on your Singer sewing machine model. Once the bobbin winder is engaged, it will start spinning and winding the thread onto the bobbin.
Make sure to hold onto the end of the thread to ensure it winds smoothly and evenly onto the bobbin.
Removing the Full Bobbin
Once the bobbin is fully wound, you need to remove it from the bobbin winder. Carefully lift the bobbin off the bobbin winder spindle, making sure to hold onto the end of the thread to prevent it from unraveling. Trim any excess thread from the bobbin and you’re ready to start sewing!
Remember, always consult your Singer sewing machine manual for specific instructions on how to thread your particular model. Additionally, you can visit www.singer.com for more information and helpful tutorials on how to thread a Singer sewing machine.
Inserting the Bobbin in the Bobbin Case
One of the essential steps in threading a Singer sewing machine is inserting the bobbin in the bobbin case. The bobbin is a small spool that holds the thread for the lower part of the stitch. Without a properly inserted bobbin, your sewing machine won’t be able to create a balanced stitch.
Step 1: Locate the Bobbin Case
The first thing you need to do is locate the bobbin case. In most Singer sewing machines, the bobbin case is located below the needle plate. It is a small, metal or plastic case that holds the bobbin.
Step 2: Remove the Bobbin Case
To insert the bobbin, you’ll need to remove the bobbin case from the sewing machine. This can usually be done by lifting a latch or sliding a lever. Consult your sewing machine’s manual for specific instructions on how to remove the bobbin case.
Step 3: Prepare the Bobbin
Before inserting the bobbin, make sure it is wound with the desired thread. It’s important to wind the bobbin correctly to ensure smooth stitching. Place the bobbin on the bobbin winder spindle and follow the instructions in your sewing machine’s manual to wind the bobbin.
Step 4: Insert the Bobbin
Once the bobbin is prepared, you can insert it into the bobbin case. Hold the bobbin case with one hand and place the bobbin into the case with the thread unwinding in a clockwise direction. Make sure the thread is pulled through the tension slot or notch as indicated by the arrows or guides on the bobbin case.
Step 5: Reinsert the Bobbin Case
After inserting the bobbin, carefully reinsert the bobbin case back into the sewing machine. Ensure that it is securely in place and locked. Double-check that the thread is properly threaded through the machine’s guides and tension disks.
Now that you have successfully inserted the bobbin in the bobbin case, you can proceed to the next step in threading your Singer sewing machine. Remember to consult your sewing machine’s manual for specific instructions and refer to authoritative websites such as www.singer.com for additional guidance on threading your specific model.
Threading the Top Portion
Threading a sewing machine can seem like a daunting task, but with a little practice and patience, it can become second nature. The top portion of a Singer sewing machine is where you will thread the upper thread.
This involves raising the needle to its highest position, raising the presser foot, and following the threading guide.
Raising the Needle to Its Highest Position
The first step in threading the top portion of a Singer sewing machine is to raise the needle to its highest position. This can usually be done by turning the handwheel towards you (counterclockwise) until the needle is all the way up.
It’s important to do this step to ensure that the thread can be passed through the needle correctly.
Raising the Presser Foot
Once the needle is at its highest position, the next step is to raise the presser foot. The presser foot is the part of the sewing machine that holds the fabric in place while you sew. By raising the presser foot, you create space to easily thread the upper thread through the machine.
Following the Threading Guide
After the presser foot is raised, it’s time to follow the threading guide. The threading guide is a series of numbered steps or arrows that indicate the path the thread should follow. It’s important to carefully follow the threading guide to ensure that the thread is properly threaded through all the necessary components of the sewing machine.
It’s worth noting that each Singer sewing machine may have a slightly different threading process, so it’s always a good idea to consult the user manual for your specific model. Additionally, there are many online resources and video tutorials available that can provide visual demonstrations of how to thread a Singer sewing machine.
Threading a Singer sewing machine may take some practice, but with these steps and a little patience, you’ll be ready to start sewing in no time!
Securing the Threads and Starting to Sew
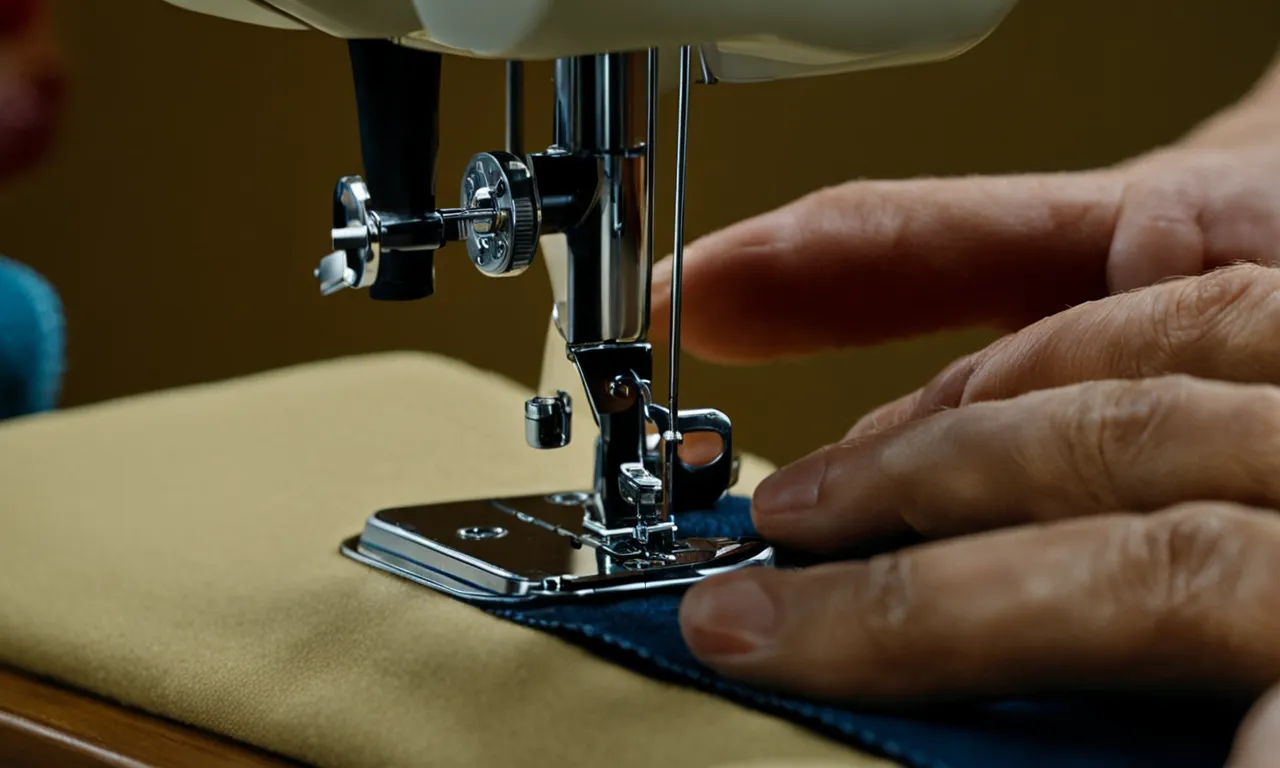
Pulling Thread Through the Needle
Before you can start sewing with your Singer sewing machine, you need to ensure that the thread is properly pulled through the needle. Begin by raising the presser foot and turning the handwheel towards you to raise the needle to its highest position.
Next, take the end of the thread from your spool and guide it through the thread guide located on the top of the machine. Then, thread the thread through the tension discs and down through the take-up lever.
Finally, bring the thread down and insert it through the eye of the needle from front to back. You can use a threader or simply do it manually by holding the thread tightly and pushing it through the needle’s eye.
Holding Thread Tails Before Starting
Once you have successfully threaded the needle, it’s important to secure the thread tails before you start sewing. To do this, hold onto the thread tails with your left hand and gently pull them towards the back of the machine.
Make sure the thread is positioned under the presser foot and behind the needle. By holding onto the thread tails, you prevent them from getting tangled or pulled into the stitching as you begin sewing. This step is crucial to ensure smooth and uninterrupted stitching.
Remember, practice makes perfect when it comes to threading your Singer sewing machine. Don’t get discouraged if it takes a few tries to get it right. Take your time, follow the user manual instructions, and soon you’ll be threading your machine with ease.
Conclusion
Threading a sewing machine may seem complicated at first, but Singer machines make it easy by providing a clear threading guide path. Just remember to start by winding the bobbin, insert it properly in the bobbin case, raise the needle and presser foot, and follow the guide from back to front.
Finish by pulling 4-6 inches of thread through the needle eye to the back, and you’re ready to start sewing!
With a fully threaded Singer sewing machine, you can confidently tackle any sewing project. The key is taking it slow and following each step methodically. Be sure to refer back to your machine’s manual if you get stuck along the way. Happy sewing!