How To Transfer Photos To Fabric With Mod Podge
Photos capture our most cherished memories. Transferring these snapshots onto fabric allows us to carry them with us everywhere we go in an artistic way. If you want to learn how to turn your photos into personalized fabric art, you’ve come to the right place.
If you’re short on time, here’s a quick answer to your question: Mod Podge is an easy to use adhesive that allows you to adhere photos onto fabric surfaces like clothing, tote bags, pillows, etc. Simply print your photos, cut to size, apply Mod Podge to the fabric, smooth the photo on, and seal it with more Mod Podge once dry.
In this comprehensive guide, we will cover everything you need to know to successfully transfer photos onto fabric using Mod Podge. You’ll learn how to choose the right photos, prepare your images for printing, select the best fabric for the project, apply the photos securely with Mod Podge, and seal and care for your finished fabric art.
Choosing the Right Photos
When transferring photos to fabric with Mod Podge, it is important to choose the right photos to ensure the best results. Here are some factors to consider when selecting your photos:
Consider subject matter and orientation
Think about the subject matter of the photo and how it will translate onto fabric. Certain photos, such as landscapes or portraits, may work better than others. Additionally, consider the orientation of the photo. Vertical or square photos tend to work well for fabric transfers.
Opt for high-resolution images
To achieve a clear and detailed transfer, it is recommended to use high-resolution images. Higher resolution photos have more pixels, resulting in better quality when transferred to fabric. If possible, choose photos with a resolution of at least 300 pixels per inch (ppi).
Focus on good lighting and framing
When selecting photos, pay attention to the lighting and framing. Photos with good lighting, where the subject is well-illuminated and there are no harsh shadows, tend to transfer better onto fabric. Additionally, consider the composition and framing of the photo to ensure a visually appealing result.
Remember, the quality of the photo will greatly impact the final outcome of the fabric transfer. Taking the time to choose the right photos will ensure that your project turns out great!
Preparing Photos for Printing
Size images appropriately
Before transferring photos to fabric using Mod Podge, it is important to make sure the images are sized appropriately. Mod Podge works best with high-resolution images, so it is recommended to use photos with a resolution of at least 300 pixels per inch (ppi).
This ensures that the transferred image will be sharp and clear. If your photos are too large, you can resize them using photo editing software or online tools. On the other hand, if your photos are too small, enlarging them may result in a loss of quality.
It is always better to start with high-quality images to achieve the best results.
Edit photos using photo software
Editing your photos before printing can enhance the overall look of the transferred image. You can use photo editing software like Adobe Photoshop or free online editors like Pixlr to adjust the brightness, contrast, and saturation of your photos.
You can also crop your images to remove any unwanted elements and focus on the main subject. Additionally, you can experiment with filters and effects to give your photos a unique look. Remember to save a copy of the edited photo before printing, as Mod Podge will permanently transfer the image to the fabric.
Print on the right paper
The choice of paper for printing your photos is crucial for a successful transfer. Regular printer paper may not give you the desired results, as it can absorb the Mod Podge and make the image blurry. To avoid this, it is recommended to use specialized transfer paper or iron-on transfer sheets.
These papers are designed to work with Mod Podge and provide a smooth surface for the image transfer. Make sure to follow the instructions provided with the transfer paper to ensure proper printing and transfer. You can find transfer papers at craft stores or online retailers like Michaels or Amazon.
Selecting Fabric for Photo Transfer
When it comes to transferring photos to fabric using Mod Podge, selecting the right fabric is crucial for a successful outcome. Here are some factors to consider when choosing the fabric:
Natural vs. Synthetic Fabrics
One of the first decisions to make is whether to use a natural or synthetic fabric for your photo transfer project. Natural fabrics such as cotton, linen, and silk are often preferred for their softness and breathability.
They also tend to absorb the Mod Podge and photo transfer medium better, resulting in a higher-quality transfer. Synthetic fabrics like polyester and nylon, on the other hand, can be more challenging to work with as they don’t absorb the medium as well.
However, they can still be used successfully with some extra care and preparation.
Fabric Color and Pattern
The color and pattern of the fabric you choose can greatly impact the final appearance of your transferred photo. Light-colored fabrics, such as white or pastel shades, tend to work best as they allow the transferred image to stand out more prominently.
Darker fabrics may require additional layers of Mod Podge or a white base coat to ensure the photo is visible. If you have a fabric with a bold pattern, consider how it will interact with your photo. Simple patterns or solid colors often work best to avoid visual distractions from the transferred image.
Fabric Thickness
The thickness of the fabric can also affect the photo transfer process. Thicker fabrics, like canvas or denim, provide a sturdier surface for the transfer and can produce a more durable result. However, they may require more pressure and time during the transfer process.
Thinner fabrics, such as muslin or lightweight cotton, are easier to work with but may be more prone to fraying or tearing. Consider the intended use of the fabric and the level of durability required when selecting the thickness.
Remember, each fabric has its own unique characteristics, so it’s always a good idea to test a small piece before committing to a larger project. This will help you determine the best fabric for your specific photo transfer needs and ensure a successful outcome.
Applying Photos to Fabric with Mod Podge
Gather your materials
Before you begin transferring photos to fabric using Mod Podge, make sure you have all the necessary materials. You will need:
- Fabric
- Mod Podge
- A foam brush or paintbrush
- Scissors
- Photos printed on regular printer paper
Having these materials ready will ensure a smooth and successful photo transfer process.
Make sure your fabric is clean
Prior to applying the photos, it is important to ensure that your fabric is clean. Any dirt or debris on the fabric could interfere with the transfer process. Simply give the fabric a quick wash or wipe it down with a damp cloth to remove any dirt or dust particles.
Apply a base coat of Mod Podge to the fabric
Start by applying a thin, even layer of Mod Podge to the area of the fabric where you want to transfer the photo. Use a foam brush or paintbrush to spread the Mod Podge evenly. This base coat will help the photo adhere to the fabric and prevent any air bubbles from forming.
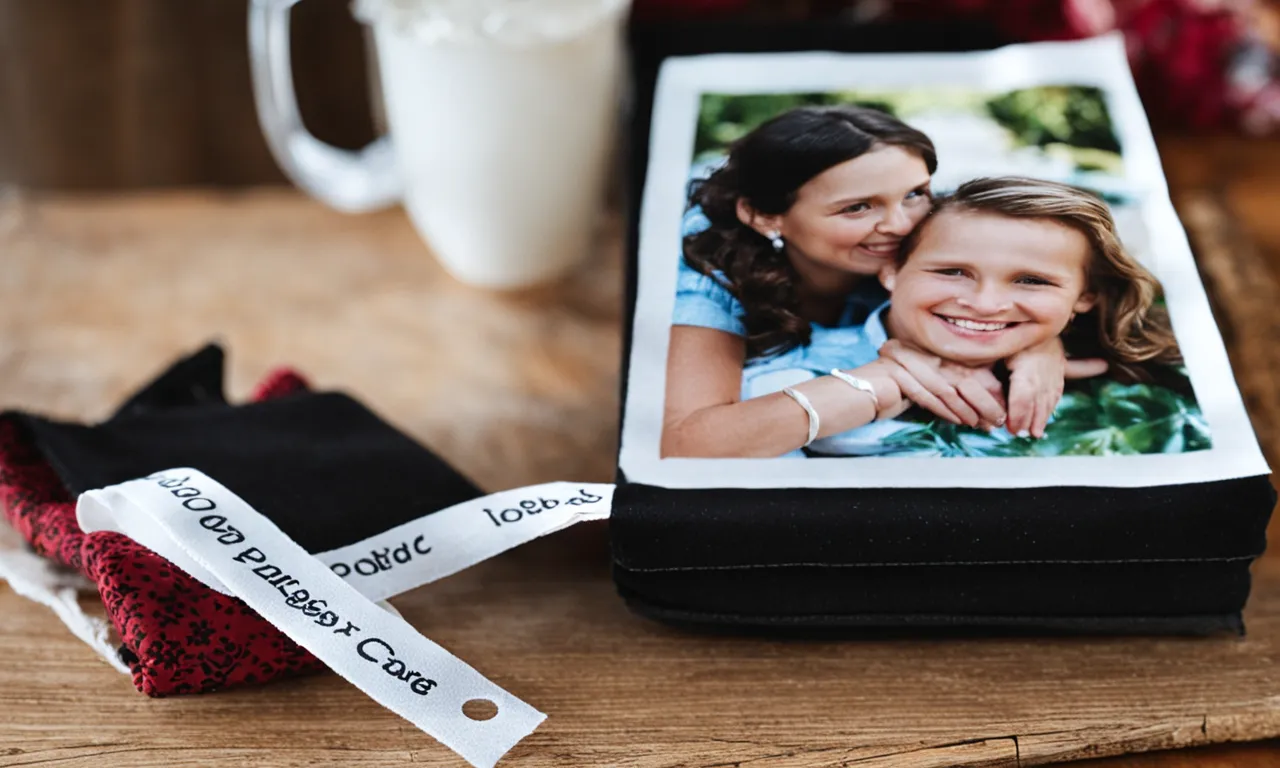
Smooth the photo onto the coated fabric
Once you have applied the base coat of Mod Podge, carefully place the photo onto the coated fabric. Gently press down and smooth out any wrinkles or air bubbles. Make sure the photo is properly aligned and centered on the fabric.
Apply a top coat of Mod Podge over the photo
After the photo is in place, apply another layer of Mod Podge over the top. This top coat will seal the photo and protect it from damage. Use long, even strokes to apply the Mod Podge and ensure a smooth finish.
Let it fully dry
Allow the Mod Podge to fully dry before handling or using the fabric. This may take a few hours or overnight, depending on the climate and humidity. Once dry, your photo transfer is complete!
For more detailed instructions or tips, you can visit the official Mod Podge website at https://plaidonline.com/brands/mod-podge. They have a wealth of information and project ideas to inspire your creativity.
Sealing and Caring for Your Fabric Art
Apply a sealant for extra protection
Once you have transferred your photos to fabric using Mod Podge, it is important to apply a sealant to protect your artwork. A sealant acts as a barrier between the fabric and external elements that can potentially damage or fade the image.
There are various sealants available in the market specifically designed for fabric art, such as fabric sealant sprays or fabric medium mixed with Mod Podge. These sealants not only provide protection but also enhance the durability of your artwork.
Wash gently by hand
To ensure the longevity of your fabric art, it is recommended to wash it gently by hand. Machine washing can be harsh on the transferred image and may cause it to fade or peel off. Fill a basin or sink with cold or lukewarm water and add a mild detergent suitable for delicate fabrics.
Gently agitate the fabric art in the soapy water, avoiding any rubbing or scrubbing that can damage the transferred image. Rinse thoroughly and carefully squeeze out excess water. Lay the fabric flat to air dry, avoiding direct sunlight.
Avoid direct sunlight
Direct sunlight can be detrimental to the longevity of your fabric art as it can cause the image to fade over time. To preserve the vibrancy of your transferred photos, it is best to display or store your fabric art away from direct sunlight.
If you choose to hang your artwork, consider a location that receives indirect or diffused light. Additionally, using UV protective glass or acrylic frames can provide an extra layer of protection against harmful UV rays.
Conclusion
With the right photos, preparation, fabric, and Mod Podge application, you can easily make beautiful, personalized fabric art. Not only is this project fun and creative, but it also allows you to keep your cherished memories close in a wearable form.
With the steps outlined in this guide, you now have all the information you need to successfully transfer photos onto fabric. So grab your favorite snapshots and get crafting your own custom fabric art today!